A blog about our love of Hiking. Gear we like, tips and tricks we've learnt and walks we love

Tuesday, June 7, 2011

Unexpected Curveballs

In my last post I ended by saying that we had a wonderful first day on our first overnight hike but the tranquil and peaceful afternoon and evening turned into anything but.
We have three teenage boys so to have some time to ourselves and a bit of quiet is very rare and highly sought after.
We were sitting in camp and enjoying our quiet surroundings when we started to hear a very familiar sound, children, and lots of them!

What was this? It sounded like we were sitting outside a school after the afternoon bell has just gone off. We couldn’t believe it.
It was a school group on a school hike. For the rest of the evening we had to put up with the very distracting sounds of children laughing and talking. I must say though, to their credit, they were actually very well behaved and considerate of us but it just wasn’t the peaceful time away we had envisioned when we began planning our first overnight hike.
The trip back the next day was uneventful and as enjoyable as day one.
We did learn an important lesson when it comes to hiking. All the preparation and planning in the world can’t prepare for the unexpected. The best you can do is be as prepared as possible for any eventuality and then just take it as it comes with positivity and a good attitude.
Don’t let one (or more) unexpected curveball ruin from the whole experience.

Sunday, May 8, 2011

Ubajee walkers' camp – Our first overnight hike

 
We finally did it.
In September of 2010 Margot and I finally managed to get enough gear together to head off for our very first over night hike. It was wonderful…….mostly.
We selected the beautiful Sunshine coast Greatwalk as the perfect location. Our thinking was, hike in and hike out and not too far so that if anything went wrong or our new gear didn’t quite work out we were not too far from help.
After pouring over maps and studying the DERM website we decided that the Ubajee walkers' camp suited our needs.
So we prepared and prepared, dehydrated, packed and very excitedly headed off for our first overnight hike.
Day one started at Mapleton Falls National park.
The hike kicks off through some absolutely beautiful rainforest. The first kilometer or so is an Australian grade 2-3 walk so there were a few day trippers but it didn’t take long and we were on the grade 4 track and into the hills of the sunshine coast hinterland.
Rainforest opened up into Picabeen palm forest with low ferns and then back into rainforest again. There are many very large felled trees that remain from the logging days that are now just ghosts of once great monsters now covered with a brilliant green moss.
After a couple of hours of taking our time and enjoying the peaceful and tranquil environment we decided to try out my new acquisition, the MSR Pocket Rocket stove and have a cup of coffee.
The stove worked like a little beauty. Only a minute after firing it up we were enjoying a much needed caffeine fix and listening to the birds and frogs next to the glassy stream we had selected as our morning tea spot.


We continued on after a shortish day of about 12 kilometers and before long we were selecting our site for the tent and cracking open our afternoon tea and putting the stove on for another cuppa.
Unfortunately it wasn’t to stay that way and our first night away turned into anything but peaceful and tranquil.
Find out why in my next post………

Tuesday, January 4, 2011

Damn Rats!!!

In October 2010 my wife and I hiked our first multi-day hike and we absolutely loved it. We spent 4 glorious days hiking the Conondale Range Great Walk in the Conondale range about 2 hours north of Brisbane.
The weather was magnificent and we got in just before the record rainfalls that hit QLD in November and December 2010.
However, it threatened to rain all three nights we were there. We don’t have a tent that is big enough to hold us and our two hiking packs so I came up with the ‘brilliant’ idea of placing everything in our packs and covering them with the inbuilt rain covers.
We awoke the next morning and as I was basking in the glow of my rain cover brainwave I noticed a little hole in the cover. What was the hell was this???
On closer inspection I discovered rats had eaten through my rain cover and then through my pack to get to the empty scroggin bag I had in the side zipper pocket. Damn rats!!
Needless to say the next night we hung all of our food up and out of the way of rubbish eating rodents.

Anyone have any run in with rats? Any clever ideas of how to avoid them eating through packs? (apart from hanging them from a tree)

Sunday, December 19, 2010

Hiking Poles or not?

To use or not use hiking poles is something that we struggled with.
Will they just get in the way? Should I know how to use them properly or will I just be better off saving my money and picking up the nearest stick?

I actually got our first set of hiking poles on a whim. I walked past a sale as I was buying something else and they were coincidentally reduced in price to the exact amount that I have left over after my other purchase.
“I will just grab them and figure out how to use them later” I thought.
So, after some research on how to properly set them up and techniques for using them we took them on our first 4 day hike.
They turned out to be absolutely invaluable. We found them to be very useful not only on the uphill sections but on the downhill also.
I am not claiming to be any sort of expert on the purchase and use of hiking poles but I can offer my opinion of their use and how handy they are when it comes to long distance hikes.
I honestly believe that had we not taken hiking poles on the 4 day hike we would have returned with knees and ankles that were much more sore than they were.
I strongly recommend purchasing and learning how to use hiking poles when going on an extended multi day walk.
You won’t be sorry.

Below are some links to get you started.

Wednesday, December 15, 2010

Beautiful Noosa National Park

Our first ‘hike’ was more of an extended walk as we wanted to test out and wear in our new hiking boots. (see previous blog)
We went up to the beautiful Noosa National Park
To get there drive into the main part of Noosa and turn left at Hastings Street and keep following the road for a couple of klms up the hill into the national park. There are plenty of parks for the car.
There are five tracks that you can walk from a 1klm walk for you and the kids to a longer walk that could take a few hours and is for more experienced walkers that requires a higher level of fitness.
This is from the DERM website[1]
(1) Palm Grove circuit — 1km circuit (Allow 15-30 mins) Class 2
This circuit passes through rainforest with hoop pines and piccabeen palms. The track begins near the picnic area.
(2) Tanglewood track — 6.9km (4.2km to Hell's Gates and return 2.7km on the Coastal track) (Allow 2 - 3 hours) Class 4
One of the park's more isolated inland walks, this track meanders through rainforest, open eucalypt woodlands and closed woodlands to northern Alexandria Bay. Return to the day-use area on the Coastal track. The Tanglewood track begins near the picnic area.
(3) Noosa Hill track — 3.4km circuit (Allow 1-1.5 hours) Class 4
A steady grade leads through open eucalypt woodlands and shrublands to the top of Noosa Hill. Views to the coast are restricted due to thick vegetation. This track begins past the information centre, near the entrance to the Coastal track.
(4) Coastal track — 5.4km one-way (Allow 2 - 3 hours) Class 2, 3 & 4
Class 2 to Dolphin Point (1km); Class 3 from Dolphin Point to Hell's Gates (1.7km); Class 4 from Hell’s Gates to northern Sunshine Beach (2.7km).
Skirting the shoreline from the main park entrance to northern Sunshine Beach, the track passes over several headlands and provides many spectacular coastal views. Take extra care near cliff edges and keep children under close supervision. Walk along the beach at Alexandria Bay and rejoin the formed walking track at the southern end of the beach. There is a very steep set of stairs leading down to Sunshine Beach.
You can walk the Coastal track from Noosa to Sunshine Beach and catch a bus back. You’ll need to walk 1.2km further south along the beach to the bus stop outside the Sunshine Beach Surf Life Saving Club. For bus connection details phone 13 12 30.
(5) Alexandria Bay track — 4.6km return from Parkedge Road (Allow 1 hour 15 mins-2 hours) Class 4
From Parkedge Road, a sandy track winds through open woodlands and heathlands to Alexandria Bay. You can also access this track via the Tanglewood or Noosa Hill tracks.

We elected to walk the ‘Tanglewood track’ on the way out and the ‘Coastal walk’ for the walk home.
The walk starts at the information centre and heads slowly uphill into subtropical rainforest with moss covered trees and strangler vines.

After a couple of kilometres the vegetation changes into more open bush and sandy underfoot.

Eventually after walking at a reasonable pace for about 2 hours you come to a fork in the track. Left will lead you to the top of the headland and onto the return coastal track. Right will take you down onto the beach and toward the township of Sunshine beach. Warning – this is not a circuit and you would need to retrace your steps if you need to get back to your car.
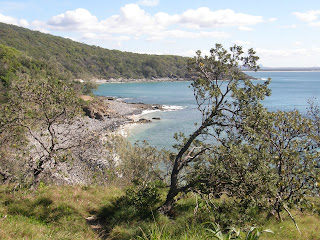
So, after turning left, you emerge at the Noosa headland and a beautiful spot called Hells Gates. It has a spectacular view of the ocean and you can watch the wave’s crash in through a natural gap in the cliffs. A great place for lunch (if you get out of the very strong wind)

The track takes you back along the coast and has constant views of the ocean below. Along the way stop and enjoy the beauty of Dolphin Bay and the Boiling Pot.

If you set aside the whole day you will have time to stop on the drive out and enjoy a coffee at many of Noosa’s beautiful coffee shops.


[1] http://www.derm.qld.gov.au/parks/noosa/about.html

Wednesday, December 8, 2010

Starting to purchase gear - Boots

After a lot of research,  many hours scouring the internet and looking through our local outdoor/hiking stores we finally came up with some gear that we decided was best both for quality and for our budget.
I’m sure we aren’t Robinson Crusoe,  in that we are not operating on an open ended budget but we also wanted to have the best quality gear as we realised that a multi day hike with the wrong gear can be a nightmare.
We started with hiking boots as I decided that this was the most important piece of gear that we would own.  We would use them on every hike we would do whether it was just a day hike or a multi day hike.
I did not want to skimp on boots as I realised from my research (and now from personal experience) that a good sturdy and comfy pair of boots are absolutely essential.
I want to make it really clear that boots are a personal thing and what boot is right for me wont necessarily be the right boot for you. However, what IS important is that you are not tempted to buy the first pair of shiny new boots with all the fancy bits and pieces that you see.
You MUST try on and try on again until you are absolutely comfortable with the boots you have chosen. I won’t say this about any of the other gear but DO NOT be swayed by discounts or other offers. You will be walking up to 20-25klms per day over anything from a day to 8 nights with about 15-20kgs on your back for a standard hike. All that time with a wrong fitting boot is NOT worth any sort of discount or fancy offer.
After looking around for a couple of months I settled on a pair of Hi-tec Vlite hiking boots.

Things we looked for in hiking boot;
1.       Ankle Support
It is very important that you have very good ankle support. Many tracks through SE QLD (and in fact all over Aus) that we walk are QLD Class 4 tracks or above which are classed as rough with uneven surfaces and exposed roots and rocks. My wife and I have both felt our ankles being held firm by these boots when we have stood on a rock or root and our ankle has tried to twist over. Not a good thing on day two of a four day hike in the middle of nowhere with help a long way off.
2.       Tread
It’s also important that you have a boot that has different types of tread on the sole. You will be walking on different types of ground on your hike. E.g. sand, grass, rock, slippery surfaces, dirt etc. they all require different types of tread to keep your feet on the ground as securely as possible. Again, getting an injury from falling or hyper extending a knee is disastrous on a multi day hike.
3.       Waterproof
The boot we chose has waterproofing half way up the boot. This is fine for most walks in SE QLD as you will rarely be wading through water any deeper than half a boot height. However, if you are going in the rainy season or you are hiking in the Kosciusko National Park or in Tasmania for example, you may need a more waterproof boot. Hiking for days with wet boots and socks would be a miserable experience. We chose this boot because hiking in QLD in a fully waterproof boot may mean it doesn’t breathe very well and may be very hot.
4.       Quality
Self explanatory. This was important to us as I didn’t want to get half way through a hike and find the sole coming off or the seams opening up. We also don’t have the money to keep buying different shoes. Before this, the most I had ever spent on shoes was $100, these cost me $270!! Worth every penny but they need to last as long as possible.

There are so many more things to look at when buying boots. Have a look around and find out what’s important to you.
Remember, don’t skimp on boots!
More gear to come….

Saturday, December 4, 2010

Where on earth do I start?

We really had no idea where to start.
Do we just go out and find the nearest park and go for a walk or do we just jump in head off to the wilderness for a week and hope all will be ok?
Well the park is nice but not quite the hike we had in mind and the week sounded just like what we had in mind but we had very minimal gear and no real idea of how to go about organising something like that.

Starting is always the hardest thing to do.
How do you take that first step? How do you kick it off? Where do you begin?
It’s going to be different for everyone but we decided that the best thing to do would be to take some shorter hikes first to get the lay of the land, so to speak.
Next post will be some track notes on our very first hike that kicked all this off.
Stay tuned……….